2. Setting up the three wheel omnidrive system
2.1. Hardware
2.1.1. Resources
| Upper controller | Raspberry Pi3 B+ with raspbian-wheezy |
| Angular position feedback | Pololu minimu9 v3 |
| Cartesian position feedback | Autonics rotary shaft encoders |
| Lower controller | 2x Tiva TM4C123GH6PM Launchpad |
| Motor drivers | Hercules motor drivers |
| Motor | DC Planetary geared motor |
| RPM feedback | Pepper and Fuchs rotary shaft encoders |
| Power source | 2x 12V LiPo batteries |
2.1.2. Setup
The following describes the PCB board used for hardware in Robocon 2016 and on which this version was developed.
//Need PCB material
2.2. Software
Raspberry Pi3 B+ -
You can follow the regular tutorials from Google about installing wheezy on Raspberry Pi. Downlad /Add image file of Raspberry Pi/ “raspian-wheezy” and burn image on SD card, plug it in Raspberry Pi and that’s it.
The image file consists of already setup tightvncserver, minIMU9-ahrs and wiringPi libraries in it. For a fresh installation you will have to install them personally.
“Putty” can be used to establish a SSH between computer and RPi.
“TightVNCserver” can be used to set up a virtual desktop of RPi on your PC screen. Follow up any tutorial on Google to set it up.
Open “terminal” on RPi and type
sudo raspi-config. A menu will appear,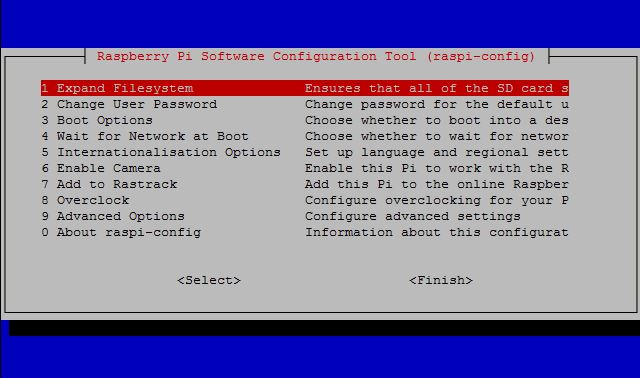
Click on
Expand file systemand affirm it.
- Now go to
Advanced Optionsand select if there’s an I2C option then make sure it is enabled.minIMU9-ahrs -
[Read through this section only if you are doing a OS install from a fresh image file]
- minIMU9-ahrs is the IMU package we will be using to interface the Pololu IMU. A detailed description on its setup can be found on minIMU9-ahrs repository
Tiva controllers -
- Code Composer Studio is a great IDE for developing codes on Texas Microcontrollers. You can download the latest version of the software from here : CCS download page
- If you face any troubles while installing, try the offline version.
- The following PDF contains a good set of tutorials on how to use ARM APIs of Code Composer Studio to code Tiva controllers.
TM4C123G LaunchPad Workbook
- SimPlot -
This is a simple plotting software where one can visualize the system’s response in form of graphs. You can download the software from : SimPlot download page
You can refer this to know about the packet format to be sent to simplot - SimPlot tutorial page
2.3. Installing the repo
Clone the repo to your local computer with the above softwares setup and hardware connections made.
**WARNING** : CHECK YOUR HARDWARE CONNECTIONS PROPERLY. YOU DO NOT WANT TO BURN ANY COSTLY INSTRUMENTS OR ELECTRONICSOpen Code Composer Studio and set the working space of your choice. Click on “Projects > Import CCS projects”. Browse to the cloned repo and click OK.
It will show some projects in the list. Choose “Triwheel - Two Wheel” and “Triwheel - One Wheel” of your versions and click Finish. You will be able to see imported projects in the Project Explorer.
Now open One Wheel project and connect the Tiva Launchpad connected to one wheel for control and burn the code by clicking “Debug”.
Similarly open Two Wheel project and connect the Tiva Launchpad connected to two wheels for control and burn the code by clicking “Debug”.
Let the program flow continuous and reset the two controllers. Open a serial monitor and select “Stellaris in circuit debug interface” COM and you will be able to see status of the controller. If there is no error, move on to the next step.
Connect Raspberry Pi 3 with your PC using SSH and VNCserver. Connect PS2 controller to RPi’s USB port.
Open “terminal” in RPi and type
cd Triwheel RPi.Type
sudo ./main.outand look for the status messages displayed in the console. If there are no errors it will start printing the RPM values being sent to each wheel.
2.4. Disclaimer
Reset the Tiva after completely starting up codes in all controllers. You don’t want to have it some random RPM that crawled in during RPi’s booting and go mad as soon as you switch on the motors.